Django Rest Framework (DRF) allows the easy creation of a reliable, flexible and secure RESTful APIs.
The idea of this guide is to take you through the setup of DRF on a live Ubuntu 18.04 LTS server running Apache2.
There are of course some guides detailing setup in a local development environment, but not many that cover what is required on a live server.
Furthermore, a lot of the guides assume knowledge of Python, and how to deal with virtual environments. Python Virtual Environments can be confusing if you have never had to deal with them before, so when I say the beginning I really mean the beginning. . .
By the end of this tutorial you should be able to see the successful install page at your domain, and log into the backend through a browser.
Although this guide doesn't detail the setup of views, models, serializers etc. I will likely include that in a part 2 at some point...
What we will cover #
I just wanted to briefly go over what we will go through in this tutorial, so you have an overall picture.
- Creation of a virtual environment which is required to install our DRF project in
- Installation of all required components and dependencies within the virtual environment
- Creation of the required folder structure for the project
- Setup of the settings file needed to get the project up and running
- Creation of a Postgresql database, and setup of the database to allow the app to function
- Creation of a superuser for use in the admin area of DRF
- Installation of the static files which allow a "browsable API"
- Setup of the API site Apache2 config file
Now obviously the above is specific to Ubuntu 18.04 on an Apache2 server.
However, most of the content will be applicable to other server OS and/or web servers with the appropriate changes to server config files and/or package management commands.
Creation of a Python Virtual Environment #
Why do we need a Virtual Environment anyway? #
When programming with Python it is considered good practise to always have you projects in a virtual environment.
![]()
One of the main reasons for this is that it allows you to keep project dependencies stable for each separate project.
Consider this... #
. . .so for example, your server last year may have been running Python 3.5. You started a project back then, and wrote the code using Python 3.5, but not within a virtual environment. Just directly on the server.
When the release of Python 3.6 comes around, you would want to keep your server up to date, so that all the other programs that rely on Python can take advantage of the improvements. Also so any new projects you write are using the latest version.
However, if you update your server, you will likely break your project that was written using Python 3.5!
This means your options are to either update the project, or don't upgrade Python. Neither is ideal. . .
...so Virtual Environments are your friend #
Virtual Environments help you avoid this situation.
They are essentially a separate box that you install all the dependencies for your project in, and they stay fixed unless you specifically upgrade them from within the virtual environment.
This means you can keep your server up to date without affecting your project!
Creating our project and Virtual Environment #
If you haven't already make sure your server us up to date.
sudo apt update
sudo apt upgrade
Then check the version of Python 3 you have installed
user@server:~$ python3 -V
Python 3.6.7
Create a folder which will hold our project. I am going to work within:
/var/www/but you can store your project wherever you see fit.
I have called my project "myapi" but you can use whatever name you like. Just replace "myapi" as appropriate:
user@server:~$ cd /var/www
user@server:/var/www$ sudo mkdir myapi
user@server:/var/www$ cd myapi
user@server:/var/www/myapi$
Create the Virtual Environment
user@server:/var/www/myapi$ virtualenv -p python3 envIf we now look at the contents of the "myapi" folder you will see that a folder called "env" has been created
user@server:/var/www/myapi$ ls
env
Now activate and move into the virtual environment
user@server:/var/www/myapi$ source env/bin/activateYou can see that you are now in the virtual environment due to the bracketed "env" in the terminal at the beginning of the line
(env) user@server:/var/www/myapi$Whilst within the virtual environment you can use "python" rather than "python3" as a command.
Any dependencies you install will be specific to the virtual environment not the server overall.
Installation of dependencies #
Whilst in the virtual environment we will be using Python PIP, which is the Python package manager (just like apt for Ubuntu and dnf for Fedora). This is included by default with Python versions 3.4 and above, so you shouldn't need to install it.
The main two packages we need are "django" and "djangorestframework".
I would also recommend installing the "markdown" package, which enables markdown in the browsable API (more on that later). Plus the "django-filter" package, which is a very useful addition when writing the api, as it allows filtering support.
So run the following:
pip install django
pip install djangorestframework
pip install markdown
pip install django-filter
Setup the project and folder structure #
We are now going to setup the project within the virtual environment. This will involve starting a "project" and an "app" within the virtual environment.
This process creates a folder structure, and also produces various Python files that will define your project and app.
Why do we need a project and app? #
To give you an idea of the concept of "projects" and "apps" in Django (which Djangorestframework is based on) I'll use a website as an example.
The "project" would be the website as a whole. The "apps" would be sections of the website, for example, blog "app" or news "app" etc.
The apps are separate components that are brought together in a "project", but are effectively self contained and reusable.
In this case there is little point making the distinction as we will only have one app, but it is always good to know why the structure exists.
For more in depth info have a look as the Django Project Structure.
Making the project and app #
At this point you should be within the virtual environment at the root of the project folder you created. Like this:
(env) user@server:/var/www/myapi$Now we will create the "project". Please note that there is a "." at the end of the next command. This is not a mistake. If you omit the "." it will create an additional level of folders that you don't need:
django-admin startproject myapi .The above command will create a file called "manage.py" and a folder called "myapi". You will therefore have the following folder structure:
(env) user@server:/var/www/myapi$ ls
manage.py env myapi
We then move into the new project folder and start a new app. In this case I will call the app "api"
(env) user@server:/var/www/myapi$ cd myapi
(env) user@server:/var/www/myapi/myapi$ django-admin startapp api
We can now exit the virtual environment. You will notice the (env) disappears.
(env) user@server:/var/www/myapi/myapi$ deactivate
user@server:/var/www/myapi/myapi$
At this point you should have a folder structure that looks something like this (Please note I have not given detail of the "env" folder contents as it is not necessary to know, but it will contain a lot of folders and files):
/var/www/myapi/manage.py
/var/www/myapi/env
/var/www/myapi/myapi/__init__.py
/var/www/myapi/myapi/settings.py
/var/www/myapi/myapi/urls.py
/var/www/myapi/myapi/wsgi.py
/var/www/myapi/myapi/__pycache__
/var/www/myapi/myapi/api/admin.py
/var/www/myapi/myapi/api/apps.py
/var/www/myapi/myapi/api/__init__.py
/var/www/myapi/myapi/api/models.py
/var/www/myapi/myapi/api/tests.py
/var/www/myapi/myapi/api/views.py
/var/www/myapi/myapi/api/migrations/__init__.py
Adjusting the settings.py file #
As you can see in the structure above there is a settings.py file located in the project folder. settings.py will have standard settings in it, but I have provided below an updated version to allow us to proceed. Take a little time to compare the two and make sure your file reflects the one below.
Note: it is only necessary to be in the virtual environment when making dependency upgrades or working with Django or Python directly. If you just want to edit the ".py" files this can be done without being in the virtual environment.
You can open the file and edit it with nano text editor (or any text editor you prefer). If you don't have nano installed you can do the following:
user@server:/var/www/myapi/myapi$ sudo apt install nano. . .and then open the file:
user@server:/var/www/myapi/myapi$ sudo nano settings.pyDo not just copy and paste the file below over your file! Your file will have a "secret key" in it already. You need this, so don't overwrite it.
Remember to make sure you use your own folder paths if they differ from the ones used in this article.
"""
Django settings for myapi project.

Generated by 'django-admin startproject' using Django 2.1.5.

For more information on this file, see
https://docs.djangoproject.com/en/2.1/topics/settings/

For the full list of settings and their values, see
https://docs.djangoproject.com/en/2.1/ref/settings/
"""

import os

# Build paths inside the project like this: os.path.join(BASE_DIR, ...)
BASE_DIR = os.path.dirname(os.path.dirname(os.path.abspath(__file__)))

# Quick-start development settings - unsuitable for production
# See https://docs.djangoproject.com/en/2.1/howto/deployment/checklist/

# SECURITY WARNING: keep the secret key used in production secret!
SECRET_KEY = 'removed-secret-key-leave-yours-here'

# SECURITY WARNING: don't run with debug turned on in production!
#leave as True for now, but when you send into production (i.e. other people will use it) then set to false.

DEBUG = True

#where it says 'myapi.thetestspecimen.com' you should replace this with your actual domain name for the api.

ALLOWED_HOSTS = ['localhost','127.0.0.1','myapi.thetestspecimen.com']

# Application definition

INSTALLED_APPS = [
    'django.contrib.admin',
    'django.contrib.auth',
    'django.contrib.contenttypes',
    'django.contrib.sessions',
    'django.contrib.messages',
    'django.contrib.staticfiles',
    'rest_framework',
    'django_filters',
    'myapi.api.apps.ApiConfig',
]

MIDDLEWARE = [
    'django.middleware.security.SecurityMiddleware',
    'django.contrib.sessions.middleware.SessionMiddleware',
    'django.middleware.common.CommonMiddleware',
    'django.middleware.csrf.CsrfViewMiddleware',
    'django.contrib.auth.middleware.AuthenticationMiddleware',
    'django.contrib.messages.middleware.MessageMiddleware',
    'django.middleware.clickjacking.XFrameOptionsMiddleware',
]

ROOT_URLCONF = 'myapi.urls'

TEMPLATES = [
    {
        'BACKEND': 'django.template.backends.django.DjangoTemplates',
        'DIRS': [],
        'APP_DIRS': True,
        'OPTIONS': {
            'context_processors': [
                'django.template.context_processors.debug',
                'django.template.context_processors.request',
                'django.contrib.auth.context_processors.auth',
                'django.contrib.messages.context_processors.messages',
            ],
        },
    },
]

WSGI_APPLICATION = 'myapi.wsgi.application'

# Database
# https://docs.djangoproject.com/en/2.1/ref/settings/#databases

#We will be using a Postgresql database. Replace the database name, user and password with what you would like to use when we setup the database in the next section of the article

DATABASES = {
    'default': {
        'ENGINE': 'django.db.backends.postgresql_psycopg2',
        'NAME': 'dbmyapi',
        'USER': 'myusername',
        'PASSWORD': 'mypassword',
        'HOST': 'localhost',
        'PORT': '',
    }
}

# Password validation
# https://docs.djangoproject.com/en/2.1/ref/settings/#auth-password-validators

AUTH_PASSWORD_VALIDATORS = [
    {
        'NAME': 'django.contrib.auth.password_validation.UserAttributeSimilarityValidator',
    },
    {
        'NAME': 'django.contrib.auth.password_validation.MinimumLengthValidator',
    },
    {
        'NAME': 'django.contrib.auth.password_validation.CommonPasswordValidator',
    },
    {
        'NAME': 'django.contrib.auth.password_validation.NumericPasswordValidator',
    },
]

# Internationalization
# https://docs.djangoproject.com/en/2.1/topics/i18n/

LANGUAGE_CODE = 'en-us'

TIME_ZONE = 'UTC'

USE_I18N = True

USE_L10N = True

USE_TZ = True

# Static files (CSS, JavaScript, Images)
# https://docs.djangoproject.com/en/2.1/howto/static-files/

STATIC_URL = '/static/'
STATIC_ROOT = os.path.join(BASE_DIR, 'static/')

#These are some settings that make the setup more secure you don't need these if you don't want them

SECURE_SSL_REDIRECT = True
SESSION_COOKIE_SECURE = True
CSRF_COOKIE_SECURE = True
SECURE_HSTS_SECONDS = 3600

#Uncomment the section below if you want to remove the browsable API later on. For now just leave this section hashed out

#REST_FRAMEWORK = {
#    'DEFAULT_RENDERER_CLASSES': (
#        'rest_framework.renderers.JSONRenderer',
#    )
#}
########################################################
Setting up the Postgresql database #
There various options of database that can be used for DRF, but I personally recommend Postgres as it is the closest to the real SQL standard, has an extensive feature set, and is open source.
The other options are sqlite, MySQL and Oracle, should you prefer to use one of those.
I'm not going to go into a lot of detail here, but if you want more info on setting up postgres, Digital Ocean have a great tutorial.
First we will install postgres:
sudo apt install postgresql postgresql-contribThen we log into the commandline interface for postgres:
sudo -u postgres psqlYou should now see a new commandline like this:
postgres=#We now need to create a user, a database and then assign the user to the database.
Remember to use the same details that you put in your settings.py file we setup in the previous section:
postgres=# CREATE USER myusername WITH PASSWORD 'mypassword';
postgres=# CREATE DATABASE dbmyapi;
postgres=# GRANT ALL PRIVILEGES ON DATABASE dbmyapi to myusername;
Then we can check it has worked by listing the databases.
Note: that there may be other items listed, but we should have at least the below:
postgres=# \l
  List of databases
     Name     |  Owner   | Encoding |   Collate   |    Ctype    |     Access privileges
--------------+----------+----------+-------------+-------------+---------------------------
 dbmyapi      | postgres | UTF8     | en\_US.UTF-8 | en\_US.UTF-8 | =Tc/postgres             +
              |          |          |             |             | postgres=CTc/postgres    +
              |          |          |             |             | myusername=CTc/postgres
If the databases is listed correctly we can then quit the postgres commandline:
postgres=# \q
user@server:/var/www/myapi/myapi$
We are now in a position to connect the database with django rest framework:
user@server:/var/www/myapi/myapi$ cd /var/www/myapi
user@server:/var/www/myapi$ source env/bin/activate
(env) user@server:/var/www/myapi$ python manage.py migrate
The above command should setup the necessary parameters within the database you have just created.
If there are any errors reported double check that the parameters you setup for the database are correct in the settings.py file.
Create Django Superuser #
To allow you to log in and administer the API from a browser you need to create a superuser for the project:
(env) user@server:/var/www/myapi$ python manage.py createsuperuser --email admin@example.com --username adminYou will then be prompted to enter a password for the user as well.
Once the setup has been completed successfully you will be able to access the admin area from a url like this:
https://myapi.thetestspecimen.com/admin/
Obviously the domain will be whatever you choose to setup, which we will get to in the last section.
Download static files #
DRF features a Browsable API.
What this essential means is that once you have setup endpoints you will be able to access them from a browser to see how they respond.
Take a look here for more details.
As the browsable API has some static components, we need to download them into our project so that the browsable API renders properly:
(env) user@server:/var/www/myapi$ python manage.py collectstatic If you then run:
(env) user@server:/var/www/myapi$ ls
manage.py env myapi static
You will see the addition of a static folder. You can then exit the virtual environment:
(env) user@server:/var/www/myapi$ deactivate
user@server:/var/www/myapi$
Setup Apache2 for the API domain #
This section you may be able to handle without instruction, but I have included just for completeness.
We are basically going to setup the "sites-available" config file for the api domain. This will tell apache2 where to find the python files it should load when that specific domain name is requested.
In this case the setup file will contain the configuration required for a https connection to the API. This assumes that an SSL certificate has been setup for the domain. If this is not the case, you will have to adjust the setup to work without SSL (which I don't recommend).
You can setup a free SSL certificate using Let's Encrypt, but it can be a little fiddly to get setup and to autorenew. I intend to write an article for this in the future, but for now check out this guide.
In this case I am going to use an example domain of "myapi.thetestspecimen.com"
Set A Records #
If you haven't already, go to your server setup and make sure that you have created a set of A records for the domain you intend to use.
If you are not sure how to do this then check your server providers help files, as it varies with provider.
Create config file in sites available #
We need to create the config file so apache knows where to look for the project. Obviously use your own domain name not the one below:
user@server:/var/www/myapi$ cd /etc/apache2/sites-available
user@server:/etc/apache2/sites-available$ sudo touch myapi.thetestsepcimen.com.conf
user@server:/etc/apache2/sites-available$ sudo nano myapi.thetestspecimen.com.conf
Within the file paste the following, with the appropriate changes to folder paths and domain names:
#Example Django Rest Framework File

<VirtualHost *:80>
    ServerAdmin admin@thetestspecimen.com
    ServerName myapi.thetestspecimen.com

    Alias /.well-known/acme-challenge/ /var/www/myapi/.well-known/acme-challenge/
    <Directory /var/www/myapi/>
    AllowOverride None
    Options None
    ForceType plain/text
    </Directory>

    # This is optional, in case you want to redirect people
    # from http to https automatically.
    RewriteEngine On
    RewriteCond %{REQUEST_URI} !^/\.well\-known/acme\-challenge/
    RewriteCond %{HTTPS} off
    RewriteRule (.*) https://%{HTTP_HOST}%{REQUEST_URI} [R=301,L]

</VirtualHost>

<VirtualHost *:443>
  # Virtual host configuration + information (replicate changes to *:443 below)
  ServerAdmin admin@thetestspecimen.com
  ServerName api.thetestspecimen.com
  DocumentRoot /var/www/myapi

  Alias /static /var/www/myapi/static
  <Directory /var/www/myapi/static>
	Require all granted
  </Directory>

  <Directory /var/www/myapi/myapi>
	<Files wsgi.py>
		Require all granted
	</Files>
  </Directory>

  WSGIDaemonProcess myapi  python-home=/var/www/myapi/env python-path=/var/www/myapi
  WSGIProcessGroup myapi
  WSGIScriptAlias / /var/www/myapi/myapi/wsgi.py

  # SSL certificate + engine configuration
  SSLEngine on
  SSLCertificateFile /etc/letsencrypt/live/thetestspecimen.com/fullchain.pem
  SSLCertificateKeyFile /etc/letsencrypt/live/thetestspecimen.com/privkey.pem

</VirtualHost>
Once you have saved the file we then need to load the config file and restart apache2:
user@server:/etc/apache2/sites-available$ sudo a2ensite myapi.thetestspecimen.com.conf
user@server:/etc/apache2/sites-available$ sudo service apache2 reload
Check the admin site works! #
At this point we are done with the basic setup.
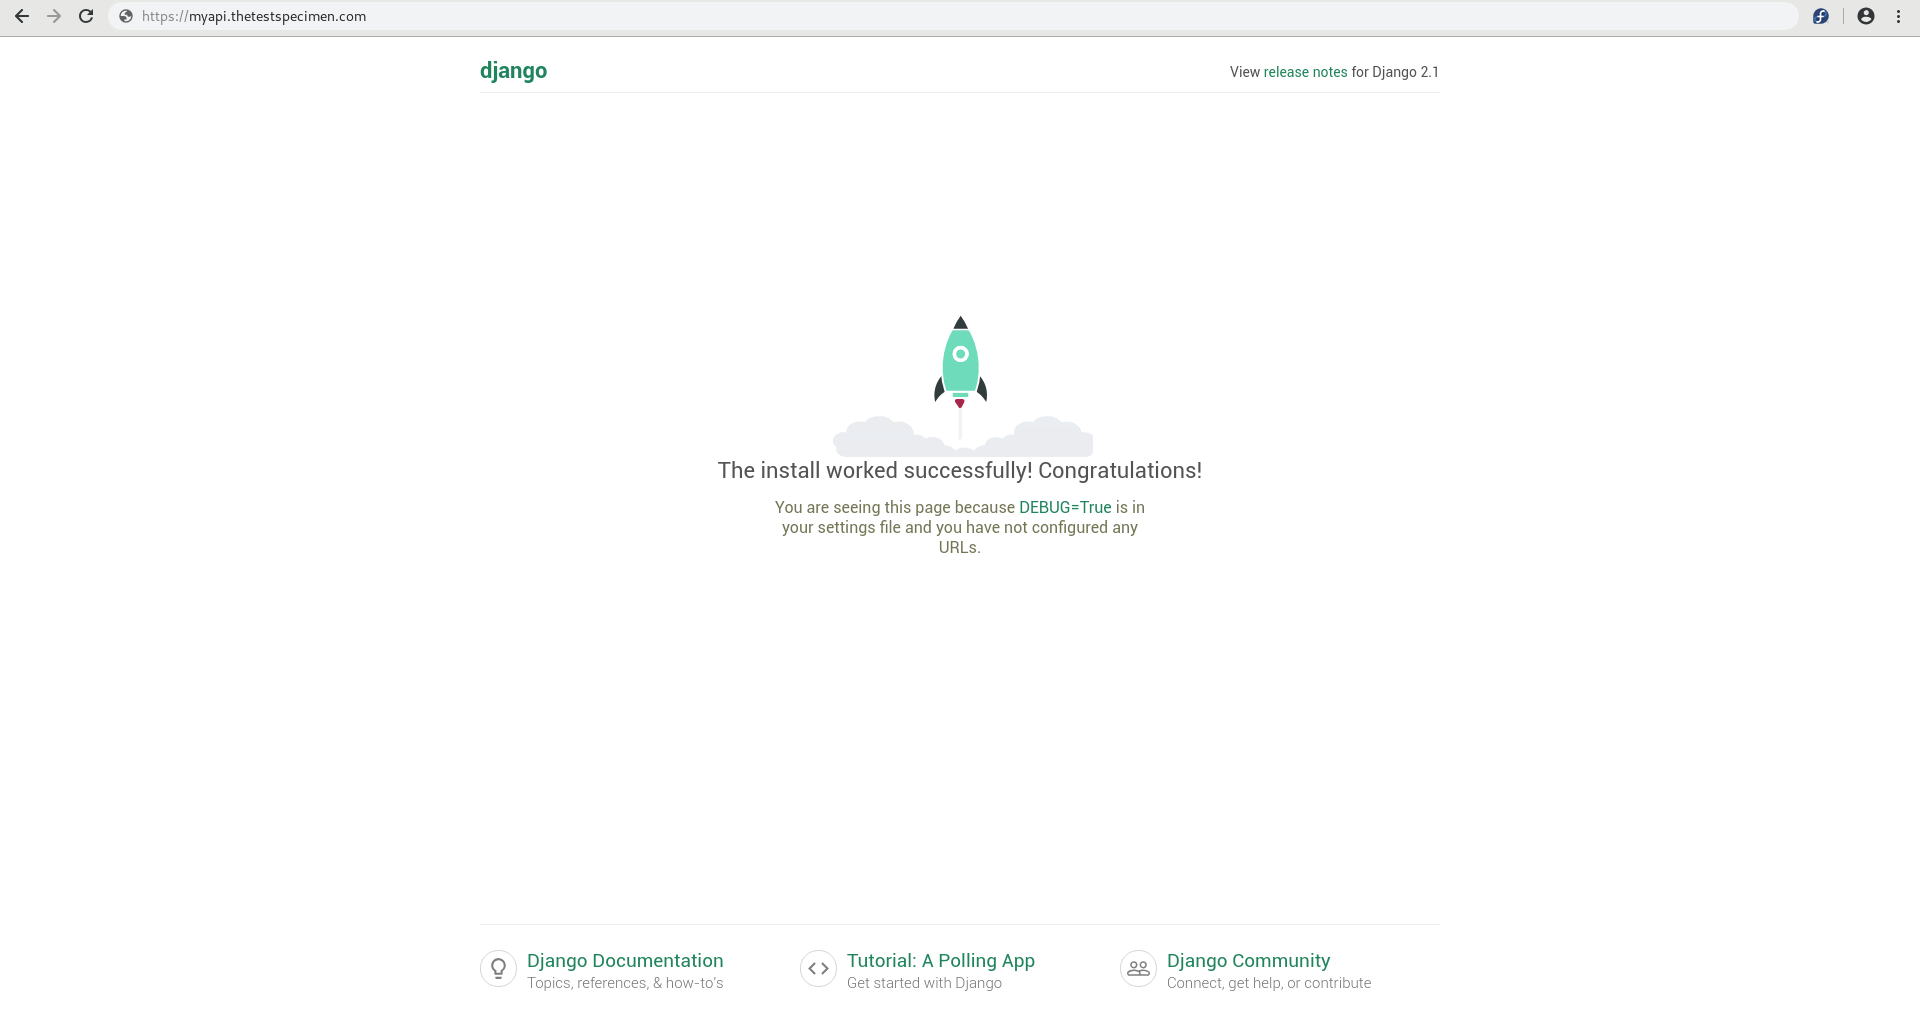
We can check if everything we have done worked by visiting the API url in a browser. In my case "https://myapi.thetestspecimen.com". You should see this:
Furthermore, we can check all the settings worked by visiting the admin site and logging in with the superuser credentials you created earlier.
Going to "https://myapi.thetestspecimen.com/admin" I will see the following (remember to use your own domain when you try it):

The End! #
You should now be able to start the journey of setting up your RESTful API.
Django rest framework makes it really easy to achieve an excellent API without boilerplate code. You should be up and running in no time!
Best of luck, and if you have any questions, let me know in the comments or send me an email.
As alluded to at the beginning of the article, I intend to write a part 2 to this tutorial. It will detail a basic setup of the configuration files so you can get some endpoints working. Watch this space. . .
🙏🙏🙏
Since you've made it this far, sharing this article on your favorite social media network would be highly appreciated. For feedback, please ping me on Twitter.
...or if you want fuel my next article, you could always:

Published